Liebster Blog Award Nomination

Thursday, November 15, 2012

I am very excited, surprised and just a teensy weensy bit chuffed to have been nominated for the Liebster Blog Award.  A lovely big thank-you to Susan at Achieving Creative Order for nominating this little blog of mine.


The Liebster Award is given by bloggers to up and coming bloggers who have less than 200 followers. It is to show new bloggers that they are appreciated, and to help spread the word about new blogs.

There are some rules that go along with it...
 
1.  You must post 11 random things about yourself.
2.  Answer the questions that the nominator set for you.
3.  Create 11 questions for the people you nominate.
4.  Choose 11 blogs you love (with less than 200 followers) and link them in your post.
5.  No tag back.
 
Okay, then. Let's get started.
 
11 Random Things About Me
 
My pet peeve (actually I have many) is people who don't know how to merge in traffic.
My wardrobe is frequently a mess.
I love old chairs.  I have 3 in the shed waiting to be DIY'd.  They've been waiting for about two years now!
I am not as strict with my daughter as I was with my son.
I love to smell my children.
I once saved a fly from a spider's web then felt sorry for the spider so threw in an ant!
I've slept in a subway in Madrid.
If my house is a mess, my brain is a mess.
I've climbed 3 mountains.
I wanted to be ABBA when I was young.
I LOVE a good cup of coffee ... oh, and donuts!
 
Susan's questions for me
 
What is your biggest regret in life? Oooooo, I don't like this question.  You can almost always learn from something that you might have done in your life that didn't go exactly to plan or caused you some sort of discomfort so to "regret" it would mean not accepting growth and learning from it.  This is probably getting way too deep now (sad face!) so let's just say I wish I had gone to university (which would've meant missing out on years of travelling ... see, tough question!).
 
If you had one word to describe yourself, what would it be? Loyal.
 
Who is your favorite actor? I have many faves but Morgan Freeman would be up there.

What is your favorite midnight snack? Midnight?  Really?  This mumma is never up at midnight.

Do you like to sing in the shower? If so, what do you like to sing?  Nope.  I rest, recuperate and relax in there.  It's my end of day therapy. :)
 
What experience(s) have marked you the most? Hands down our son being diagnosed with cerebral palsy.
 
Are you a night owl or a morning person?  Ummmm, neither.  I'm tired in the morning and tired at night.  Does that make me an afternoon person?
  
How superstitious are you? Not very although I probably wouldn't walk under a ladder.  
 
What is your one achievement that makes you most proud? Bringing two beautiful little humans into this world and providing a loving, balanced, nurturing, healthy family environment for them to live in (I know that's probably extremely soppy & corny but it's true).
 
What was your worst dating experience? Whoa, let's NOT go there. If my mum or sister are reading this, they will totally understand. 
 
What three things would you take with you on an island? Bear Grylls, my pillow & a hair tie (oh, wait, what about clean knickers ... especially with Bear Grylls as your companion!).
 
My questions for my Nominees
 
Is blogging what you thought it would be?
If you could choose any profession in the world, anything, what would it be?
Jeans and a tee-shirt or a lovely dress?
Do you make your bed in the morning?
How would you spend your perfect day?
What do you like best about being a blogger?
What is your most favourite food in all the world?
Who would you like to be trapped in an elevator with?
What's the craziest thing you have done in your life?
What totally gives you the irrits?
What are you wearing right now?
 
And my 11 nominations for super-duper, lovely little bloggie blogs are:
 
 
Thanks again, Susan, and all the best to everyone nominated.
 
Lots of warm & fuzzies to you!
 

Lemon Sugar Hand Scrub

Friday, November 9, 2012

If you're looking for a simple, lovely & quick homemade gift for someone, this "Lemon Sugar Hand Scrub" is perfect. 


I found the original recipe here (thank you, Stephanie Lynn!) but have since noticed it all over the www.  I made some last year for a work colleague and for my Mum, and the other day I made another batch for a very special, very pregnant friend (she will also be able to use it on her tired, aching feet!) and for my son's Kindy class who have decided on a "glass jar stall" for their school fete this weekend.  We were asked to fill a jar with something - size, shape and what went inside was completely up to us.  I decided not to fill the jar with lollies or toys but to aim my little jar of goodness at the beautiful Mummy's out there.

The scrub is made up of just 3 ingredients - Lemon, Olive Oil & Sugar - all of which you most probably have in your pantry.  I added a few drops of Lemon Myrtle essential oil (for extra yumminess) because I just happened to have some in my cupboard.  Despite its simpleness, the scrub is not only effective at removing dirt, grime, glue, paint or whatever else it is that gets on our hands from crafting, sewing, DIY'ing, gardening, playing etc but it also leaves them feeling silky smooth and looking loved.  Happiness in a jar.


If you'd like to give this easy-peasey lemon-squeezy scrub as a gift and don't have the time (or the inclination) to whip up a cute little gift tag, I have included mine here for you. I haven't added Lemon Myrtle in the ingredient list, just in case it's not something you have laying around.

Yours in hand health,

World Map for Kids

Monday, November 5, 2012

Our 5 year old frequently asks questions about the world, Australia and where we sit in relation to other countries.  He will say "Can we drive to Canada to see Nanny & Poppy, Mum?", "Can we go there on the weekend?", "Is Sydney in Australia?", "I really want to go to Bali with my cousins - can we visit them tomorrow?", "We're learning to speak Italian at school - where is Italy, Mum?" ... and so on.

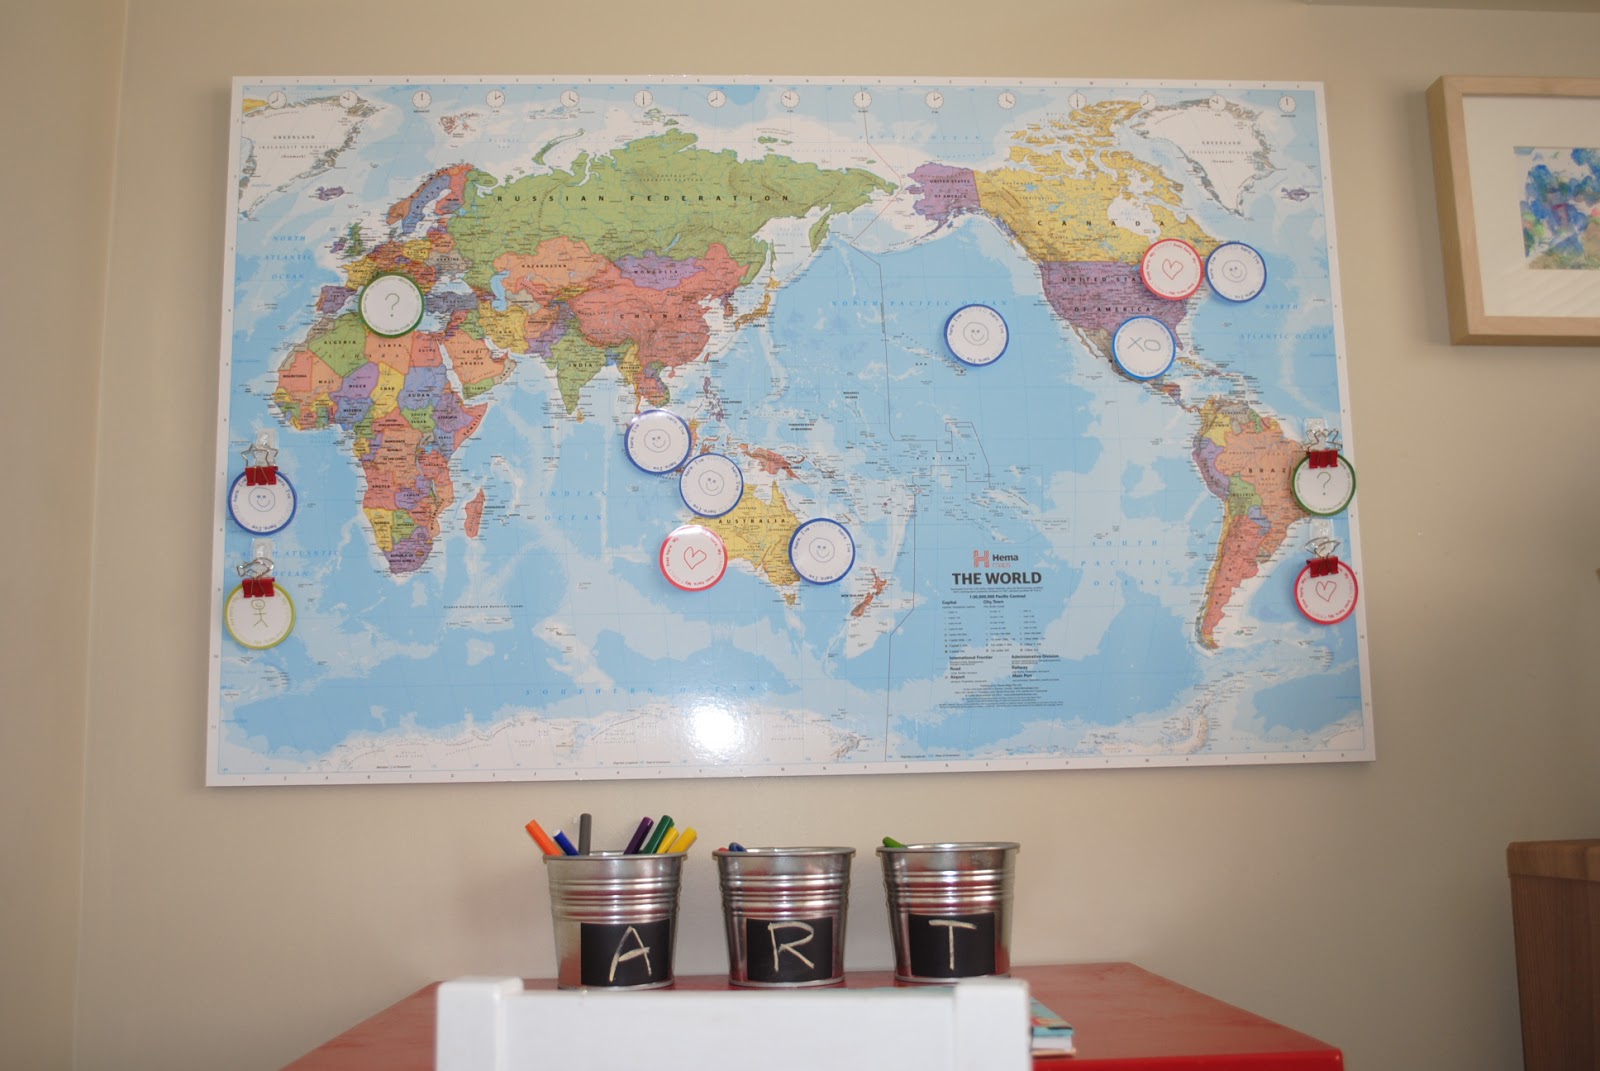
To help him better understand the world and its vast expanse and that, no, you can't drive to Canada or just pop around to see his cousins in Bali, we bought him his very own world map.


I bought it online from Mapworks and then had it mounted on 10mm foamcore for sturdiness and durability without being heavy.  To further improve his understanding of the world and his place in it, and to make the map personally interesting to him, I made up some personalised "pins" for him.  I made up five:

  1. My FAMILY lives here (my husband is Canadian so we have families on both sides of the world. Hello Canadian family!!)
  2. I've VISITED here
  3. My FRIENDS live here
  4. I'm LEARNING about here
  5. My MUM & DAD met here (my personal fave!)


I designed them using Avery's Design & Print online program using their L7105 round labels.  I then laminated the labels, again for durability and longevity, and cut them out.   I attached the pins to the map using velcro dots, which I actually think I have a bit of a crush on.  How super handy and versatile are they?  I've added some spare pins to the side of the map using 3m hooks and bulldog clips  - you know, just in case we get our "travel on" soon and need to add a stack more pins.  Oh, those were the days.

 
Now he can see for himself where Italy is.
 
 
Little sister getting in on the action - placing Family in Argentina!
 
Please excuse the rudey-tudey lamp shade.  I sent my husband out for fire wood and that's what he came home with!
 
We all love the map and not only is it educational but it also adds a lovely, big-boy touch to our son's room and allows him to see at a glance where in the world he has been, where his family lives and where he might like to learn about or travel to one day (but not tomorrow).

So, a fun little project that turned out exactly how I had envisaged (love that) although what I didn't count on was our son noticing just how close Bali actually is to Australia and now he REALLY, REALLY wants to go there!  Oh dear, he's learning faster than I expected.

And because I like to share with you the things that didn't work particularly well, if I were to do this project again I would probably:

  1. Not have a border around my round label.  It is very difficult (read impossible) to get the alignment perfect when printing
  2. Make the pins a bit smaller - perhaps half the size
  3. Use Word which I think would be quicker than the Avery system

If you're thinking of putting a map in your child's bedroom or in their playroom and you want to use my pins, please feel free - download away.  You can either print them directly onto the L7105 round labels or just print them out on paper - up to you.  And don't worry, the little black marks you see around the centre drawing do not print out.  I have no idea what they are. 

Enjoy the world, and happy pinning!

"Monica Closet" no more

Tuesday, October 30, 2012

We love our house but it has a serious flaw.  It has virtually no storage.  It has a pantry and a linen closet and that's it.  Honestly.  When we built the house, nine years ago, there were no children, no real plans for any and we'd just returned from years of travelling and living out of a backpack so a linen closet and a pantry seemed very 5-star and mature (and just to prove how much in backpacker mode I was, I even took out the walk-in robe from our design because I didn't think I would fill it.  I know - what a fruit loop.).  Enter children, possessions and time and this little house is bursting at the seams.  Every nook, cranny, cupboard, basket and box is full of something.

The only closet I have, which is one half of the linen closet, has been the "everything" closet, the closet where anything that doesn't have a home gets dumped.  In other words, it has become the "Monica Closet".  If you are a fan of the Friends sitcom, you will totally get this, but if not here's the definition;

"A closet or room in your house where you put everything you don't know what do with; just crammed with stuff, and very messy. From the TV show "Friends". The character Monica was an obsessive neat-freak, but it was revealed in one episode that in fact she had a closet stuffed completely full of junk."


The thing was, I actually had two issues.  Not only did I have a closet that had become a rubbish tip, I was also trying to contain an ever-growing fabric collection, storing it all over the place in baskets, boxes, bags and on my dining room table (for a neat-freak that's just not on).  I knew I had to find a new home for it all and preferably a visual home where I could glance at my supply rather than having to rifle through the whole stash.  The only place I could think of was "Monica".  I knew she could do it but, boy, did she need some loving to bring out her true potential.  The truth is, I had no choice, "she" was my only option so "loving" it was.

The big stash sort out.

 This is what I did over about a 4 week period: 
  1. Emptied and cleaned out the entire cupboard (except the bit where the vacuum cleaner and dusters live - that's a whole other project).  A fresh coat of paint would've really freshened things up but I didn't want it to become a mammoth project.
  2. Ditched, donated and divided all the "stuff".
  3. Asked my husband to install a curtain rod to the middle area.
  4. Bought three new plastic boxes (on sale at K-Mart).
  5. Bought 24 trouser hangers from Spotlight (very cheap).
  6. Filled the boxes and labelled them (I used these lovely labels from the BHG site).
  7. Hung my fabric. 
  8. Smiled - BIG.


 I decided to hang my fabric so that I could easily see it at a glance but also because I still needed the storage space for other stuff and this way I could utilise the area underneath it.  I could've also popped matching boxes or baskets along the top shelf, and I don't know if it's just me, but not everything fits neatly and perfectly into pretty baskets so I would've just been doing it for aesthetics and not for practicality.  I actually prefer the freedom and flexibility of simply stacking my bits, which also makes them easy to access.  And I know this is considered dangerous (and I'm generally not a risk-taking type of person!) but I've labelled one of my boxes, "Orphans".  Again, some things just don't have the perfect home or category so now they can live together happily, keeping each other company in their very own "orphanage".
 
I'm really liking "Monica's" facelift and although it ended up taking quite a few weeks, I am happy that I kept "plucking" away at her to eventually get the job done.  I've now got a super-clean, super-neat cupboard AND a place for my fabric.  The only downside is, now that all my fabric is staring me in the face, I really should start doing some sewing and even worse, what excuse do I have now for yet another trip to Spotlight?
 
How about you? Do you have a "Monica" living in your house? Please don't let me be the only one. 


Sandwich Bag Photo Album

Monday, October 22, 2012

Today's post is brought to you by "Bob Basic" - he may be a fairly simple kinda guy but he's sturdy, strong and always reliable.  He brings you "The Sandwich Bag Photo Album".

My little girl adores photos and spends quite a bit of time checking out photo's on my phone (I have 731 - is that too many?), in my albums and the ones displayed around our home.  She likes to take the framed photos from our hall table and wander around the house with them - kissing them, pointing out who's who, calling out their names - but she's a toddler and she's rough, and clumsy and she often drops them too.  (This photo was taken just yesterday on my phone for my Mum & Dad who are away at the moment - she grabbed their photo and kissed it.  Awww.)


So, to encourage her photo fascination and her love of family (and to discourage her breaking my frames!), I made her up her very own, "child-proof" little "album" using 18cm  x 17cm sandwich bags.


The photos in the album are random family photos printed very basically on my printer.  I did not take much time with the selection process - maybe 10 mins at the most.  This is one of those projects that doesn't need to be painstakingly time-consuming or particularly perfect.  It is, afterall, for little (more often than not, grubby) hands. 

Just for something different, I printed out the photos then tore around the edges, rather than cutting (I have no idea why probably just adding to the whole rustic'ness of it all).  I made up a square template on plain copy paper and typed in the family member's name/s.  I then pasted the photo on to the square, cut it out and slipped it into a sandwich bag.  I have a total of 22 photos in my album but you can do whatever number suits you.  The bags are then held simply together with a ribbon.  Basic but so practical, and absolutely perfect for little hands who like to pull, rip, throw, chew and generally mistreat (not always intentionally) this type of thing.


To respect my family's privacy, I have covered over their names (not everyone wants their name in lights!)


I actually made one of these for my son four years ago and it's still in the toy box, still together, and is still being flicked through.  Gotta heart that. 

Take care, enjoy your family and if you think you might like to make an album up yourself, let me know and I will email you the template.

Yours, "Bob"


Door-knob "Hooks"

Tuesday, October 16, 2012

I have never really had a designated spot to hang our bags and inevitably they would end up thrown over a dining chair, dumped on the floor or just left somewhere they shouldn't be.

After seeing this little gem of an idea on Jen Jones' I-Heart Organizing blog, I knew this was something I could replicate and I already had the perfect spot for it - right by the entrance door from the garage.  Perfect.  My dining chairs would finally be spared the indents left from the weight of the bags hanging off their corners and my floor would be free of bag (and eye) clutter.

It was a very simple and relatively quick project.  I pinched a piece of spare skirting board my Dad had laying around, which my husband cut to size, and then chose some cute little ceramic door knobs from My Love Story on E-bay for $6.65 each (plus postage, which does almost double the cost - shhhh, I didn't tell my husband that little worthless tidbit of information).  I painted the skirting using leftover paint from my bed makeover and gave it three coats. 


Ceramic door knobs
I then measured out in pencil where I needed the holes drilled for the knobs and then hand-balled the project to my hubster.  Using a masonry drill bit, he pre-drilled 5 holes in the skirting and the wall, inserted wall plugs and then just screwed the knobs onto the board and into the wall.  They sit in their new home nice and snug and are very strong.  Job done.  Our bags are now not only off the floor but are hanging from some very fancy-smancy "hooks".  Wife very happy.  And you know what they say - "Happy Wife, Happy Life".


To give you an idea of where the hooks sit (just as we walk in from the garage).
How about you?  Have you used something in a way that it was not necessarily intended?  Do share - I'd love to hear about it.

Car Games for Kids

Wednesday, October 10, 2012

A little bit later this week we are going on a road-tip and if you've travelled in a car with kids before for any length of time longer than, let's say, half an hour, then you know it can mean only one thing.  Fun and games.  Fun and games.  If there ain't any games, there's not a whole lot of fun going on!  Right?  Right.

So, to fill the time between snacks, eye-spy, "are we there yet?", fighting, naps, more "are we there yet?" and more snacks, I decided to make up a few games.  This way they would have something brand new, different and interesting to play with and would hopefully keep them amused for a fraction longer than a millisecond.

I read somewhere ages ago about using an oven tray, some magnets and toy cars to make magnetic games perfect for car travel.  I searched around on Pinterest for some game "pinspiration" but because most of the ideas were very US-related or not particularly age appropriate for my kids, I decided to just make my own.  I called upon my inner creator (she comes out from time to time and it's always so lovely to see her!), refilled the ink in my printer and tapped out some games - all to be used on an oven tray with magnets.

The first one is a race-track.  I googled around for an image and there were quite a few to choose from but I liked this one mainly because of the colours and the variety of interest happening around the track.  I found this image (it's actually a pretty awesome rug) on the Doodle Girl Thoughts blog.  I then just super-glued little round magnets to the underside of four of my son's cars.  He can then race his little cars around and around (and hopefully around again) without the cars falling off and ending up down under his seat (which would not only lead to frustration but would most definitely lead to more fighting, more "are we there yet?" and more "fun and games"!).


The second one is an educational Maths game.  I already had magnetic numbers so I decided to incorporate them into a game and at the same time help our son with learning numbers.  He will simply roll the two dice, add them together and then find the correct magnetic number to place on the game number.


The third one is also educational (not that he'll ever know!) and will help him with spelling and word recognition.  He will need to find the correct magnetic letters and place in the correct spot on the game.


I also bought a tray for my daughter and made her up a very basic game (she's not even 2 yet), again, using some wooden shapes I already had from a play set.  You might be thinking why didn't I just give her the wooden shapes play set she already has and save myself the hassle ... BUT ... believe me, this IS saving the hassle.  If my son has something, she must have that something too and there would be absolutely no peace and quiet for any of us if he had himself a little oven try and she didn't.  You know how it is, sometimes you simply have to pick your battles and this particular battle (backseat, 2 little kids, long road ahead, no coffee in sight) is not a battle I care to pick!


All the game sheets are laminated and have little velcro dots on them for attachment to the oven trays.  When the games are up, they store perfectly in an A3 plastic envelope and when the kids are totally sick of it all I will remove the velcro dots and start using my two brand new oven trays!


And, call me a pushover, but in the name of peace-keeping, fun, games AND equality, I whacked on some magnets to my little girl's two (and only) cars.  Why do things look so much cuter in pink?


 PS:  Both the numbers and letters games are free for you to download if you need some backseat distraction any time soon.  Enjoy. x