Friday, September 21, 2012

Car Seat Catchall

Does the back of your car look like this?


Ours does.  All the time.  Actually it is usually much, much worse and includes such delights as old apple cores, dried out half eaten sandwiches and a sultana or two (hidden in just about every crevice).  Gross, disgusting and embarrassing, especially when said "stuff" falls out in the school parking lot!

Anyway, try as I might I just haven't been able to keep the car tidy and the messier it gets the messier it tends to get - the whole "if you can't beat 'em, join 'em" thing.  And whilst the little pockets at the back of the seats are great, they don't tend to hold too much, nor cope with the odd dragon or truck trying to be stuffed in.  And my Dad telling me how much of a pigsty my car is ("I can't believe you girls!  Your houses are immaculate but your cars are disgusting" he has said on way more than one occasion) hasn't helped matters.  So, Dad, this project is for YOU! Even though, of course, you will never read a post in your life or in fact even know what a blog is.

So, what did I decide to do?  Throw out all toys and not allow them in the car again?  Get a two-seater sportscar (ooooo, tempting) in which the kids don't fit?  Ignore it?  If you know me, you would know that is pure crazy talk.  No.  The answer came in the form of the "Car Seat Catchall" (sorry, couldn't think of a clever or cute name).  It's a big 'ol sack with an elasticated opening that has straps at the top and the sides to attach to the back of the seat.  Its sole purpose is to stow away all the toys (the books, the dragons AND the trucks ... the apple cores and sultanas will be dealt with separately) very easily and quickly, keeping the car clutter-free, clean and tidy and just generally a nicer space to be in. It also makes for a much happier, saner and less red-faced Mumma ... who at 40'ish is still trying to please her Dad!!!


The sacks were very simple to make.  I chose fabric from my basket - I was adamant I wasn't going to purchase more.  To personalise the bags, I added the initials of my kids - F & K - mainly just for fun & cuteness!  I used my Silhouette Cameo to cut out the letters but you can easily cut fabric letters by printing a template on paper and then tracing onto your fabric, which I have always done in the past.  I then just folded over my fabric into a rectangle, sewed up the sides, added a casing at the top for the elastic and included straps at the top and at the sides (I added these before sewing up the sides and triple stitched them so they'd hold up to the hefty dragons and trucks).  And that was it.  Very simple, and they were a breeze to attach to the seats.  Basic but functional.


Grrrr, before.  Ahhh, After
How about you?  Does a messy (read "pigsty") car send you loop-di-loop, or are you able to ignore it and accept it's all part of having sticky little people and all their sticky "stuff" with you 24/7?

Friday, September 14, 2012

DIY Memory Game

How annoying is it when a project or idea starts out really good and then quickly ends up going pear-shaped? Very. Especially when your free time is fleeting.  However, because I'm all about sharing and caring, and the project DID eventually turn out, I will pass it on - "warts 'n all".
 
I love "Project Life". I have been doing it since January this year and I'm a big fan.  If you haven't heard of it and have no idea what I'm talking about, you might want to check it out.  In short, it is a beautiful form of memory keeping that has been made super-simple.  Think scrapbooking but without any glueing, cutting, tools or skill required. Anyway, this isn't actually a post on "PL" but if I have piqued your curiosity and you want to know more, then have a look at Becky Higgins' website.  It's pretty awesome and completely inspiring.
 
So, now for the connection.  While reading Becky's blog one day, I read about a "DIY Memory Game" made with spare Project Life "filler" or "journalling" cards together with family photos.  I loved it.  Immediately.  I knew I was going to recreate it.  I set to work.
 
It was a "relatively" (more about that further down) simple process:
  1. Choose your cards/cardstock for the back of the photos
  2. Choose your photos. I used very ordinary photos cropped to head & shoulders size
  3. Print out your photos in "wallet" size
  4. Adhere photo to card
  5. Laminate
  6. Trim to size
  7. Print out instructions if you want them


And, you're done!  Now you have a beautiful, fun, family-oriented Memory Game with very, very special characters.  We have had a lot of fun with it and our son has improved each time he's played.  Our daughter is still a bit young and would probably eat the cards so I'm hoping they'll stand the test of time and still be intact when she's old enough.
 
Now for what they don't tell you, and where I started to see the "pear" emerge ...
  1. Do not glue the photos to your card.  The glue will show through on the card and look ugly.
  2. Do not then try and fix the problem by adding an extra layer of cardstock to the back because it will be too thick, won't laminate properly and will look ugly.
  3. Do not laminate the cards in an A4 pouch because then you have to cut them up and the layers will most probably separate and look ugly.
  4. Do not then try and glue every square millimeter of the separating layers because the glue will ooze out all over the photo, your fingers, your table and make a complete mess.  Learn to live with these little imperfections otherwise you will go insane and things will get ugly.
So, the moral of the story is ...
  1. Use double-sided tape between photo and cardstock.
  2. Do not have more than two layers.
  3. If you want to laminate, use wallet-size laminating pouches and laminate each one separately.
See?  Sharing and caring.
 
How about you? Have you ever started out with a plan and then had to rethink & redo along the way? Perhaps that's half the fun.  Catch you next time ...

Thursday, September 6, 2012

Pegs, Paint & Play

This particular little project happened during "a little bit of noise", rather than "a little bit of quiet", just to switch things up a bit! 

My son had one of his best little girlfriend's over for a play-date so we decided to pool our resources and work on a fun little activity together, which is normally always a hit with kids - keeping their hands and minds busy at the same time.

I had bought some wooden pegs from Spotlight a few weeks ago (I was there looking for supplies to make a "fascinating fascinator", which is a whole different "fascinating" post and one that I will write about soon, but I kept getting strangely distracted) and wasn't sure exactly what I was going to do with them but really just loved the old-fashioned look of them.  Anyway, they sat there for a bit looking all plain and cute and then I decided I would, or we would as it turned out, make a little learning game out of them.

I chose four different paint colours - green, yellow, pink & blue - and set the kids up painting all the pegs. While they painted, I cut up a Huggies nappy box into little rectangles and put a splodge of paint on each one and then wrote the corresponding colour in words, just with a black marker.  See where I'm going with this? A very simple colour recognition game.  The idea of the game is to slip the correct coloured peg onto the correct colour card.  Not only are they learning their colours but the little ones are working on their dexterity by having to slide the peg onto the card.  Beautiful!  As you will see this is way too easy for my 5 year old, as it should be, but I did it with my 19 month old in mind and, well, she needs a bit more practice! 

The supplies.
 
Busy little hands.
 
Beautiful co-operation.
 
In the sun to dry.
 
In action.
 
Bless her, she's trying!
  
Packed away for another day.
This was a great, easy, no-fuss activity to do with the kids and we all enjoyed ourselves - plus the sun was shining, it was warm and we were outside.  I even had a coffee with me ... talk about ticking all the important boxes!

(Oh, BTW, if you like this idea but can't be bothered with the craft aspect of it, or you just want something a little more "mature" and a whole lot more fancy-pants, then Bianca from "A Little Delightful" has made up some beautiful colour cards which are free for you to print and use. I adore her blog and her work.)


Sunday, September 2, 2012

A "Striking" Good Bowling Party

I totally loved their little shoes!
We celebrated our son's 5th birthday recently and because we had decided not long after his first birthday not to have big parties for him every year, instead opting for every 2nd or 3rd year, my husband suggested we have a ten-pin bowling party and let our son invite any three friends of his choosing.  That way it would be a small affair with just the four of them but special because they would be doing something a little different to the norm, something interactive and the day wouldn't be lost in the chaos.

What a great idea it turned out to be!  If you're ever looking for a low-maintenance party but high on fun, then bowling really is a good option.  It is an all-inclusive party which means us Mums can sit back, relax and enjoy the moment/s rather than working ourselves into a frenzy, baking like crazy people and organising games & activities requiring military precision.  Yes, the food, decorative touches and the birthday cake were basic but little boys really don't care about that stuff.  They just want to have fun, play and open presents!  Check, check & check.

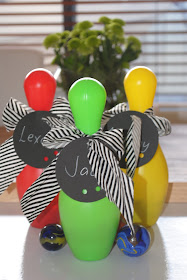
Although it was all-inclusive and I really didn't "need" to do anything, I wanted to give the boys a little personal something to take home.  I read somewhere about using plastic bowling pins as party favours by cutting off the necks and filling them with lollies, which I thought was perfect - almost.  I didn't like the idea of sending the boys home with so much sugar (boys already have enough energy) so instead I filled them with marbles and included instructions on how to play (just in case their Daddy's were born a bit later than me!).  They also got a "Tom Bowler" (that's the really big marble - for all you Mummy's reading this who may have been born a bit later than me!) which represented the bowling ball.  I really liked the marble option for the whole no-sugar thing but mainly because I wanted the Dad's to go home with their sons and show them how the game was played "back in the day" - bringing back an old-fashioned game that was once a lunch-time tradition in many Australian schools.  I actually think the Dad's were more excited than the kids, which was kinda cool to see. 

The supplies.  Plastic bowling pins and marbles from Big W and bias-binding and cardstock from Spotlight.

I partly cut through the necks so they could be open and closed.

Our almost-5-year-old had fun "plopping" the marbles in.
 
The instructions, which were rolled up inside the pin.
 
The finished product.  I actually made four so that our son could play marbles too!
 
Little mini-pins in the proper big bowling centre :)
So, all in all the party was a success - the boys had heaps of fun together, they learnt something new, they ate cake and they took home something they could share with their family & others.  I loved the way it all turned out. 
 
Our little man, hoping for a strike.
How about you? Any tips, tricks, suggestions or ideas for future low-key kids parties with a difference?