Underwater Birthday Adventure

Tuesday, August 6, 2013

 
Gosh, it feels like ages since I've sat down to write a blog post - I may have forgotten how!

Last year for my son's 5th birthday, we held a Tenpin Bowling Party for him where he got to invite three of his best little friends to a morning of bowling, rather than having a big, all-out, crazy, expensive, chaotic affair at home.  It worked really well, the boys had a great time and because there were only four of them, they could focus on each other, enjoy their bowling and just have a bit of fun without all the "fuss".  Sometimes I think kids' parties are just too big, too busy and end up becoming a bit overwhelming for our little ones.  Anyway, this year, because it worked so well last year, we decided to do a similar thing.  Our son chose three of his friends from pre-primary and we took them all on an "underwater adventure" to a fabulous aquarium we have here in WA called AQWA.  It is such a fantastic place for kids to learn about marine life and to really get up close and personal with Western Australia's sea creatures.  This is how it played out ...

We made up some paper bowl "Jellyfish" invitations (I got the inspiration from here).


I packed some activities for each of the kids to do when they needed a break from all the visual stimulation (read when four boys together start to get a little cuckoo for coco pops).  I downloaded some Year 1 - 3 level activity sheets straight from the AQWA site where there is a tonne of resources and educational info.  It really is a very well thought-out site, especially for kids and schools.
  
 
Because the trip to AQWA was a bit over an hour by car, I packed a little snack box for each of them.  They didn't need too much, with our arrival time being close to lunch, but you know what kids and food are like ... plus food always helps in long car rides!


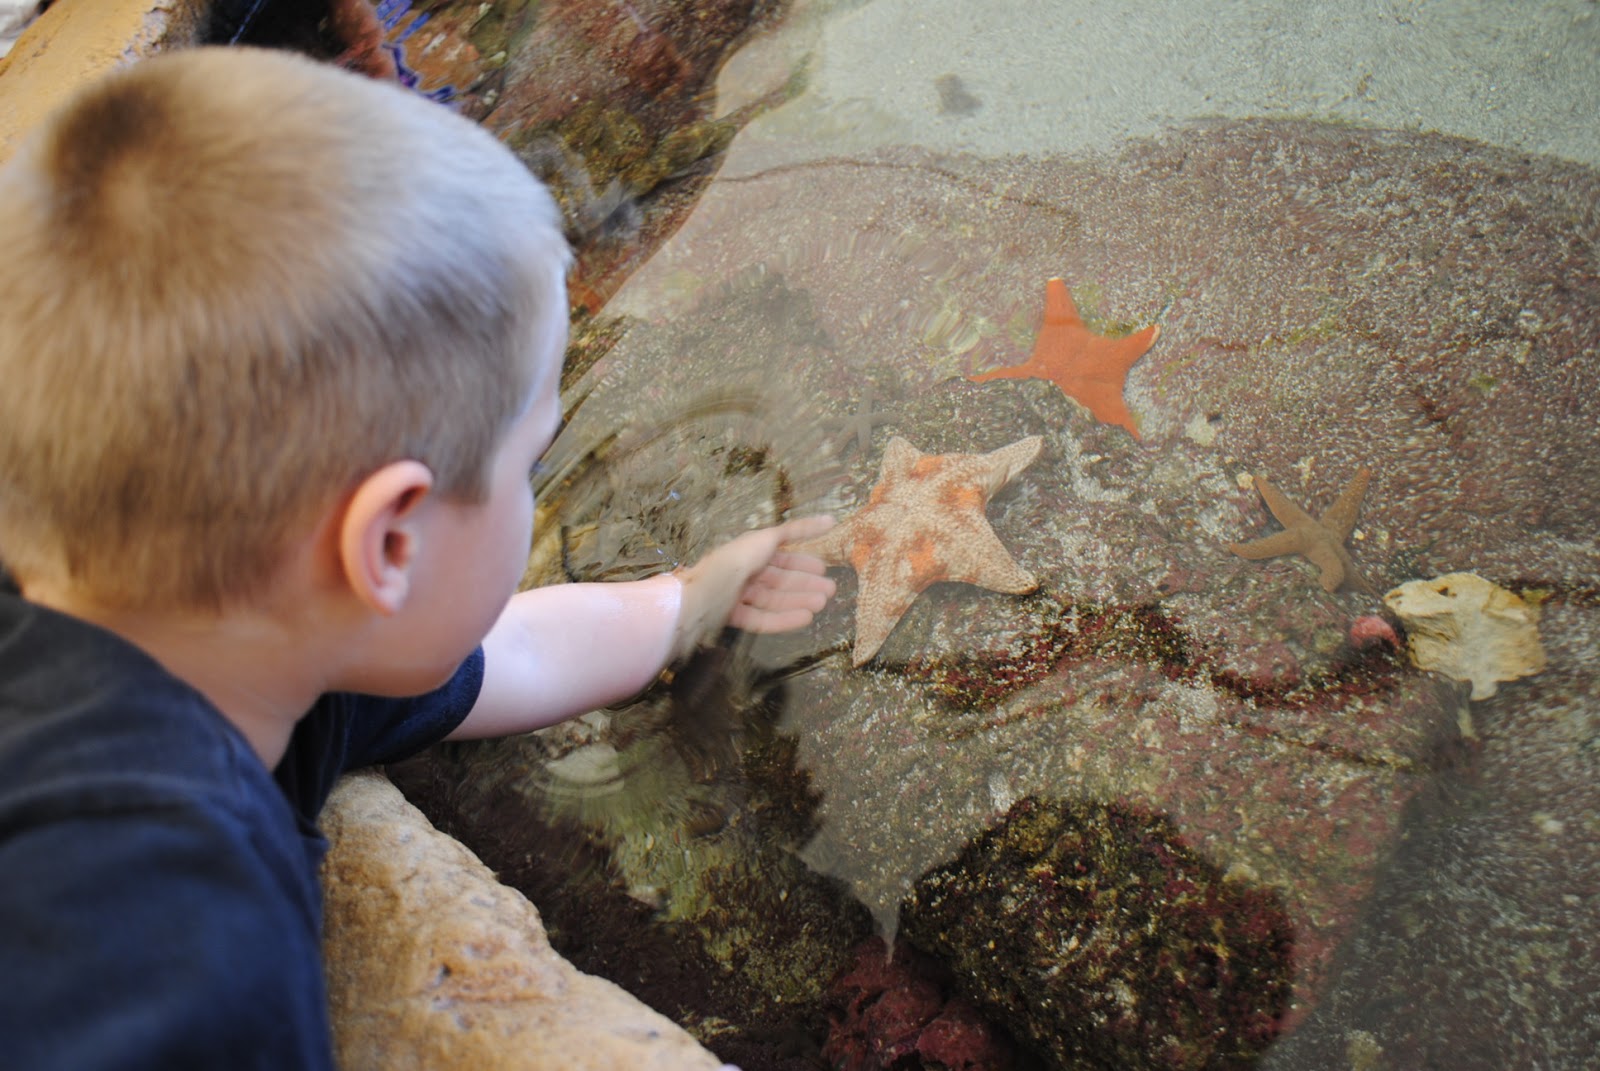
The fun starts the moment you arrive at AQWA.  There are over 40 beautiful living exhibits of WA marine life for the kids to get excited over and learn from.  There's sea dragons, there's pineapple fish (what?), there's fluro anemones and then there's the ... walk-through aquarium!  Oh my goodness, just try to contain four boys while they walk under 3 million litres of Indian Ocean water in this magical underwater world - it's tough, I tell you, tough. With stingrays casting giant shadows as they glide overhead, or sharks looking you directly in the eye as they cruise slyly by, or graceful and gorgeous turtles slowly making their way towards you for a closer look - the boys were in awe.  They were in their element and genuinely interested and intrigued by the sea creatures surrounding them - and, of course, a little rambunctious and excitable, but then again they're little boys and this is their "thing", they "get it". When inside time became too much, we headed out to "Marmion Marine Park" where the kids could handle live sea animals - sea urchins, starfish, coral - in a Touch Pool (they loved, loved, loved this) and then wandered across to a quiet lagoon called "Stingray Bay" where an abundance of rays and fish swim, and almost nibble, at your feet. It's a very chilled area and is perfect for taking-5 with the kids, especially in great weather. 


AQWA is a very cool place for both kids and adults and taking our little birthday group there was a lot of fun, and educational too - it also saved me from becoming a stressed-out weirdo over having to put on a birthday "production".  I tend to get a bit crazy (and grumpy) if I've got something big to organise ... I'm more of an "intimate" kinda girl!
 
As a type of "favour", I sent the boys home with a dried thorny starfish each which I bought from a lovely site called "Simply Shells".  I'm not particularly into shells myself but the site really does have a beautiful variety of shells, sea urchins and starfish, and the quality is so much nicer than the mixed bags of shells you sometimes see in Spotlight and Cost Plus - plus they are sustainably sourced and only prolific breeding shells are stocked, which made me feel okay about my purchase.


All in all, this little "underwater adventure" was a success and from all accounts the boys (and one little sister) really did have a "whale" of a time.  Hehehehe.  Had to get that in!

Oh, and we did have cake - the day before at our family lunch, and in keeping with the theme I tried my hand at chocolate cupcakes with black fondant shark fins.  Yay, they worked ... always a gamble when it involves me and cupcakes!  I did actually slip with the bicarb soda but the kids were none the wiser!  Phew.


Have you been on any birthday adventures lately? 

A Winter Road-Trip

Monday, July 1, 2013

 
Next week is the start of the July school holidays (hoorah!) so we are heading north for a bit of warmth and chill-out time. We will be spending a week at a remote little beachside community about 600kms from our home where there is nothing but the beach and an itty-bitty General Store. The only thing for us to do will revolve around the beach and relaxing. A real escape. The perfect opportunity to do nothing. To just be. I like the sound of that.

I am trying to pack very lightly and to not take too much stuff for the kids. I figure they'll be at the beach or outside for the majority of the time anyway - but for those times they need some quiet, inside time (and Mummy needs a quiet coffee - yes, I'm taking my coffee machine with me!), or if the weather outside isn't fantastic, I have put together just three little boxes of amusement.

The first one - MAKE - is a "jewellery making kit". I bought about 5 packets of beads from Spotlight, plus some I already had in our craft box, and bought a variety of twine, stretchy thread and silicone bangles so they can put together whatever type of jewellery they feel like. They may even collect some shells and make up their own.

 
The second one - CREATE - is just a random selection of paper cut-outs for the kids to glue on paper. I was given a beautiful company profile last week at work from a Graphic Design company and the illustrations were so lovely I brought it home and cut it up for the kids to use. I'm quite sure that's not really what he had in mind for his professional publication!

 
The third one - PLAY - is my absolute favourite and so beautifully old-fashioned in my mind. It's Paper Dolls!!! I haven't played with Paper Dolls since I was a kid and haven't really noticed them "out there" so when I stumbled across The Toymaker website, I was so excited. It really is a beautiful, whimsical site where you can find lots and lots of free downloadable paper toys to make, as well as free bedtime stories and other wonderful things. The owner of the site, Marilyn Scott-Waters, does all of the illustrating herself (such a clever lady) and her goal is "to help grownups and kids spend time together making things". Love it. Old fashioned, original, beautiful and free. What a find. And, because there are both boy and girl dolls and clothes, I think my son will have a fun time with it. I'm hoping my daughter will too but she's two and, well, not the gentlest little lady when it comes to delicate paper things. I hoping her big brother will show her how it's done!


So that's about the size of the "craft station" for our week away. If it gets used, great, but if not it will always come in handy back here at home.

The car-ride to our holiday destination is going to be a rather long one but I'm not overpacking or overthinking that either (thinking "pack-lightly, pack-lightly"). For the first time ever we will be using DVD players - a lovely friend is lending us her double DVD player so the kids will both have a screen at the back of their seat. It's going to be such a novelty for them, the problem will be turning it off! They will also have their "drawing boards" (Etch-a-Sketch thingies) which are permanently in our car, their own notebooks and colour pencils and some activity books, plus their regular toys in the Car-Seat Catch-Alls I made last year. I may also take the DIY Magnetic Games from last year but it will depend on how much room we have.
 
 
And last but not least (and this was a brilliant idea from my sister which I am extremely grateful for), I have bought two Stable Tables so the kids have a nice steady spot on their laps to draw, eat and play. We can also use the tables while we're away to eat in front of the TV ... 'cause we're on holiday and you're allowed to do stuff like that on holiday!!


This is totally not the Stable Table I bought but it was so super cute I had to pop it here instead of the red and blue K-mart versions I bought! Source

So, it's time. Time to relax, time to do not much at all, time to switch off and time to be with my little family. I hope you enjoy your break (if it's school holidays where you are) and get to spend some quality down-time with your "babies" and loved ones. Take care and I'll "see you" when we return! x

Little Clay Bowls

Friday, June 14, 2013


Have you ever wanted to make something from clay but haven't because the thought of having to find a kiln for glazing and firing seemed a tad too hard?  Me too.  I had played around with air-dried clay before with my kids, making little Christmas ornaments and whatever they wanted to make - snakes, gingerbread men, unidentifiable objects, but never really took it seriously ... until the other day. 

I bought some of this air-dried clay from Spotlight the other week with the intention of letting the kids play with it again and create whatever they wanted.
While they were making snakes (again), shapes and unidentifiable objects (again) and I was sitting beside them getting a bit restless, I made some little clay gifts tags.  I rolled some doily fabric over the clay which made a really pretty impression.  I was a little bit smitten with my tags. 


Then I got a fraction excited.  I would have a go at making some small bowls, with the pretty impression.  So that's what I did - and the best bit was it was really, really easy.  Hoorah.


I rolled out a chunk of clay and laid the doily fabric over the top.  I rolled again, a few times - not too hard but just firm enough to get a good imprint.
 
I placed a small bowl over the clay and cut around it with a knife.

I lifted the clay off the baking paper and placed it gently inside the bowl.

Then it gets left to dry, overnight, or longer (I left mine two days).  Once it's dry it shrinks a tiny bit so it just falls out of the bowl.  Ohhhhhhh, this is the exciting bit because out pops a perfectly (or imperfectly as hand-made is) formed little bowl.

I then lightly sanded the rim of the bowl, using a fine sandpaper, to get rid of any rough or lumpy bits. And that's it.  No firing, no glazing, no kiln required.  A walk in the park.


Gave them a coat of white paint.  The clay is white and can be left that way but I just wanted it to be white-white not grey-white.


I decided to use both bowls in my little girl's room for her growing collection of hair-ties and clips so I wanted to brighten them up a bit.  I painted one yellow on the outside and one yellow on the inside. 


I also finished them off with a gloss varnish (I used Jo Sonja's Gloss Varnish but you could probably use any water-based varnish). Squeal!!!  I love it when an idea turns into super-cuteness reality!


Here is my daughter's collection of hair-ties and clips, spilling over, in a way-too-small trinket box ...

 
And now in their new home ...


And some "hand-made imperfection" close-ups ...


What do you think?  I really like them, totally love the pattern thing, and I'm pretty sure I have found a new addiction (oh dear).  I still have half my packet of clay left so I will definitely be making some more.  I might even have a go at making some small plates or even tinier vessels for holding things like paper-clips, pins, craft supplies etc.  What I love about the air-dried clay is its versatility and that it's so accessible and easy for everyone to use.  You don't have to be creative to use it - just have a play and see what happens.  If you don't like what you've made, squash it, roll it out again and try something else.  Try pressing the clay with different patterns, shapes or objects ... grab a leaf and see what that does, or something out of the kitchen drawer, or the Tupperware cupboard.  Just have a go. 
It's therapy, I tell you!

Small Messenger Bag

Sunday, June 2, 2013


Last month my Mum asked me to make her a bag.  So I did.  She wanted it in black and white (to match her bathers ... watch out Europe!) and just big enough to hold her sunscreen, sunglasses and phone.  She would be spending a fair bit of time around the many beautiful pools of Europe so a cool little bag was on the list.  It had been ages since I'd made a bag - I think the last one might have been the Tea-Towel Totes - so it was a good excuse to get the machine out and do something I hadn't done before.
 
I googled away and found this really lovely free "Reversible Messenger Bag" pattern and tutorial from Crazy Little Projects.  I love that there are so many free patterns available on the net.  It makes the whole process super-easy.
 
The tutorial was very easy to follow, had good bright photos and the bag was easy to make and would be suitable for a beginner level sewer.  Once I started, it came together very quickly.  I chose two patterned drill fabrics for a little added sturdiness.  Personally, I wouldn't have chosen black & white for myself but I actually really liked the way it turned out. I cut out one of the birds and top-stitched it onto the front of the flap, just to add a little something extra to the bag.  I also have a bit of a "thing" for the selvedge edge (for non-sewing people - it is the edge of the fabric which has the name of the fabric printed onto it and is normally discarded). I included it in the design of the bag - I like the added character it gives and it just seems a waste to cut it off. And because the bag is reversible if it gets dirty or Mum gets bored with the pattern, she can reverse it out for a completely new look ... which, of course, is very important when you're flitting around the European coast!


And guess what? Here's my very stylish Mumma proudly showing off her bag in Cyprus (seriously, how good does she look for a granny in her late 60's?!).  She tells me it's holding up well and even fits her I-pad mini ... which of course you totally need while flitting around the resorts of Europe because you miss your kids like C-R-A-Z-Y (crazy!) and need to constantly look at their beautiful photos to keep from missing them too much! Teeheehee.


Enjoy your holiday, Mum (and Dad), we miss you, the kids miss you and we can't wait to catch up when you return.  Oh, and did I mention I might need a new bag too?  Ummm, hand-made, Italian leather ...

Umbrella Prints Trimmings Competition

Sunday, May 26, 2013


Have you heard of Umbrella Prints?  They are an Australian textile house producing seriously gorgeous hand screen-printed organic & hemp fabric.  I have been a follower of theirs for quite a while now and absolutely love their work and the overall natural, earthy flavour to everything they produce. So when I saw they were having a "Trimmings Competition" I was immediately interested - I had no idea what a Trimmings Competition was but it didn't matter, if it involved some of their fabric, I was excited.
 
I found out what I needed to do. 
 
  • I had to buy one of their Trimmings Packets, which in a nutshell is "a little packet of inspiration" comprising about 10 pieces of random Umbrella Prints trimmings.  Well, yes please.  I'd like one of those without even entering the competition! 
  • I then had to photograph my Trimmings Packets once it arrived.
  • Uh oh, now I had to get creative. Now I had to think.  Now I had to actually do something.  I had to make something wonderful from that one packet. Yikes, what on earth was I going to do with all those itty-bitty pieces of deliciousness? 

And then it came to me ... over about a three week period!  I would have a go at making a fabric covered notebook because not only do notebooks always come in handy, but if I had one covered in Umbrella Prints fabric then it'd be versatile AND beautiful - which is a winning combo, don't you think?  Okay, deep breath.  Here goes ...

My packet of inspiration

I couldn't get the feather to work.  It had to go. :(

The $1.95 notebook ready for its makeover

And so I begin ...

Do you see the connection? Do you? :)


Ta da!
 
 
A model always shows her back


Sitting pretty
 
And that's it - all done and ready for some pretty note-taking! 
 
Thank you, Umbrella Prints, for hosting such a fun and creative little comp - one that is good for the soul and allows us busy Mumma's to take five and focus our energy on something other than the little ones around our feet.  Love your work, love your fabric and I look forward to "Trimmings 2014"!